![]()
![]()
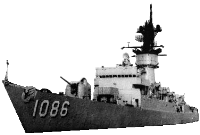
USS Brewton Model Timeline

Re-creating the "Bubba-Bee" in 1/96th Scale
John C. Sabatini, OSC(SW), USN
This whole odyssey began back in the summer of 1999… I used to do a lot of little plastic models when I was a kid, primarily so my friends and I could blow them up with M-80's in the woods when they were done. So, I (thought) I had a little bit of experience… but nothing prepared me for what I had bit off here. I am now a Network Administrator and hardware/printer tech by trade, and I took on this project as a way to get me away from the computers when I got home from work. Well, that worked out better than I had planned, as making this ship became an obsession. It was an exercise in patience and creativity, and I can't wait to get started on my second ship, USS Worden (CG-18). (Sure…)
This model is a 1/96th Scale, which means 1 inch is equal to 6 feet. I didn't quite wrap my mind around that until I got the plans and a box of little wooden strips, which was daunting enough in itself. Here I was thinking this was a "kit". HA! The plans were very sparse, and gave very few "how-to's". Normally, we computer-types don't "do" manuals, but I spent a week reading the plans over and over… and got more and more depressed, as I knew at that moment that I didn't have a CLUE what I was doing.
(OK, you guys can knock off the "sounds like a typical OS to me…" stuff now)
So, here's a rough timeline, and Mark has the finished pictures. I would especially like to thank him for the gazillion pictures of the ship he graciously provided, and for putting up with constant, stupid emails from me asking if he knew where something was placed, or how many of something there were. I'd also like to thank STGC(SW) Rick Miller for putting up with the same thing, and for stopping by every now and then to look at my progress, say "Damn, John…", shake his head, and crack open a beer.
Summer 1999:
Built the initial cradle to hold the finished hull. Built a spray paint box from a washing machine box in my garage, optimistically thinking I would be using it soon… laid down initial spars and hull supports to begin the "planking" process. Planking is exactly what it sounds like… you have to take a strip of wood, 1/2 inch wide and 2 feet long, and glue it to the supports to form the hull. You must also bend and shape the wood as you go to form the contours of the hull correctly. Once done, had to fill in the cracks with wood putty, then sand everything smooth. Then covered the entire hull with fiberglass resin and cloth, placing dimples in the sides where the tugs would always smash into us… very neat effect after the paint went on. The sonar dome was made of poured and molded resin - spent a week trying to figure out how to attach it correctly.
Fall 1999:
I realized at this point that there was nothing in the plans to indicate the hurricane bow, so spent a month fabricating it out of wood and fiberglass again. Attached the shaft, struts, prop and rudder - these are all made out of rolled brass and cut brass plate. Would later regret putting them on at this point, it made painting the hull a royal pain. Started on the 01 level and superstructure, as well as the Mack. The initial version of the mack sucked, so I trashed it and started over. Second version was great, and kept adding detail to it until just before I finished the entire ship. Sent the initial pictures to Mark, which he actually posted to the site.
Spring/Summer 2000:
Glue and paint really don't like cold weather, which I found out the hard way... went back at it in spring, and shot the first of 4 coats of paint on the hull. All haze gray at first, then taped off the waterline, and shot the red below the waterline. Continued steady work on the upper superstructure, but kept it separate from the hull, which made it easier to work on. Completed bridge and signal bridge. Shot an initial coat of haze gray on the upper levels. Kept all weapons and radars off until final coat of paint.
Fall 2000:
Detail beginning to shape up, kept at it. Joined the hull and superstructure, and of course, they didn't fit correctly. Sandpaper and a whole lot of beers fixed that. At this point, I have personally e-mailed the inventor of the Dremel motor tool, and have volunteered to have his children.
Winter 2000:
Hibernated.
Spring/Summer 2001:
Back to painting again, and the upper levels are really looking good, but dreading the lifelines and other SERIOUS detail - the more I look at it, the more I find to do. The Mack is ready to go, and is out of reach of my kids. Almost all weapons and radars are done. DESRON 33 logo's and Ships medals are done and waiting placement.
Winter 2001:
Started the lifelines. Somebody shoot me. This is so big that I can only do one side at a time, and in the case of the fantail, had to hover over the whole mess to get it right. Two spools of Rayon/Nylon thread used in this process, and that may not seem like much, unless you consider that there are about 25 YARDS of thread on each spool. My wife has expressed her wish to leave me, and take the kids. (Just kidding).
Spring/Summer 2002:
Finally joined all the elements together, glued them in place and prayed. Filled the bathtub, and the damn thing actually floated. No kidding. After the EMT's revived me, I went back to work on the flags and serious detail points… most notably the "Bee" on the hangar door, which Mark was kind enough to remind me of, and of which, I will personally shoot him for the next time I see him. :-) Obviously, it was worth it, but that whole conversation got me to thinking about EasyRider 55, and how it just wouldn't be complete without the SH-2 Sprite. Dammit...
Fall 2002:
Rigged the flags and the HF long wires, as well as the "J" Davits on the bow. Started work on the Seasprite… it just wouldn't be the same without an HSL-37 helo on the deck, so I bit in. ...and since ER-55 was with us thru several deployments, I decided to go with them. (The side numbers are correct, thanks to a REALLY expensive call to Barber's Point...) Is anyone attaching the word "obsession" to this yet… ?? I know I have. :-) Finished the Hull Numbers and moniker on the stern and bow, and took the pics - sent them to Mark and hoped he wouldn't laugh too hard...
At this point, I'm wondering who will want this monster, and if any of the museums don't, then she will stay here, no sweat. But, seriously, I really built this for all of us that have ever laid a paint brush or roller to the finest Frigate in Pac Fleet… the "B" introduced me to the Navy, as well as s ome of the finest individuals I've EVER known, and continue to stay in touch with. You can't buy that, you can't even wish for that... your time onboard the Brewton is something that you will never forget, and you will treasure forever. Trust me. UNREPS sucked, TAPA's sucked, Watches sucked, Stores On-loads sucked, and some Port Calls sucked... but you know as well as I do that this was a damn good ship, with a damn good crew... no matter when you served. I built this for our memory of the ship, and all who served her. We can only walk her decks in pictures and memories now, but hopefully this will help to keep her alive in the hearts of her Dedicated, Determined and Prepared crews...
yeah, that means us.
All the Best,
John C. Sabatini, OSC(SW), USN
[ SHIPMATES ONLINE | BREWTON PHOTOS | WELCOME ABOARD | REUNION ]
[ WHAT'S NEW | NAVY LINKS | ODDS AND ENDS | SHIP'S STORE | MESSAGE BOARD ]
[ CRUISE BOOKS | DOWNLOADS | PAGE AWARDS | EMAIL | MAIN PAGE ]
[ ABOUT JOHN C. "BUBBA" BREWTON ]